Using CustomVision to recognize chess pieces in realtime
For a customer I was tasked to demonstrate the capabilities of Azure’s CustomVision platform. CustomVision allows people without any programming knowledge at all to create their own computer vision models, and even bring this in production in no time. To help truly envision what the CustomVision platform can do, I proposed we should try to make the demonstration happen in ‘real time’. Real time in this case means drawing the labels over the recognized objects within the timespan of seconds. In this blog post, I will demonstrate how simple it is to teach a CustomVision model to recognize different chess pieces. I will use my CustomVision RealTime toolkit, github repo here, to send the images to the CustomVision API.
If you follow this tutorial from front to back, you can expect to have a working model within a few hours.
This is the end result
As you can see in the video above, which I took using my phone, the CustomVision model can recognize most chess pieces easily. It does have some trouble with recognizing the differences between a pawn and a rook, which is understandable. These pieces are pretty similar, and I’ve only fed the model about 100 photo’s yet.
On a technical level, what happens in this video is this:
- The phone takes a picture, using my CustomVision RealTime toolkit. This toolkit is run in the browser, so no app required!
- The picture is compressed on the phone, to save bandwidth, speed up the upload, and to ensure that the video does not exceed 4MB (max size for labeling in CustomVision)
- The picture is sent to the CustomVision API
- CustomVision returns the labels and the coordinates of where it has detected these labels
- The labels are drawn over the camera screen in the browser
This process typically takes between 1 to 2 seconds per picture, depending on the network speed, device speed and the size of the picture.
How to teach CustomVision to recognize different chess pieces
This is actually VERY simple and doesn’t require ANY knowledge of programming or machine learning. First, create an account on Azure CustomVision if you don’t have one yet. Then, create a project, select “Object Detection” and “General” domain.
Next step is to take pictures of your chess pieces. In order to be as efficient as possible, take pictures keeping the following things in mind:
- Take photos from many different angles
- Aim to achieve an even distribution of tags, e.g. 100 tags of a rook, 100 tags of a bishop, 100x tags of a queen etc.
- Take photos in consistent lighting (e.g. if you need to recognize the chess pieces in daytime light, feed the CustomVision model images of chess pieces in daytime light)
- Label photos accurately, draw the bounding boxes as close to the pieces as possible
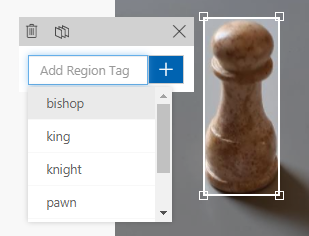
then you can label multiple chess pieces at the same time and at different angles. As such:

A minimum of 15 images per “tag” (type of object, in this case a rook, bishop, pawn, queen, king or knight) is required. Typically, more images will lead to a better result. After taking the pictures, it’s time to upload them to CustomVision. Go to the “Training Images” tab and click “Add Images”. Upload all your images. Now for each image, tag the images with the right labels.
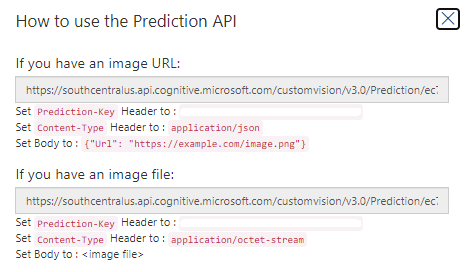
Once you have labeled all your pictures, click “train” in the top right corner of the CustomVision portal and select “Quick Training”. After a few minutes, the training will finish. In the “Performance” tab of the portal, you can see how the model has performed. If you want to test the model “in realtime”, click “Publish”. Then, click on the “Prediction URL” button. Here you can find the URL + key, which you will require in the next step.
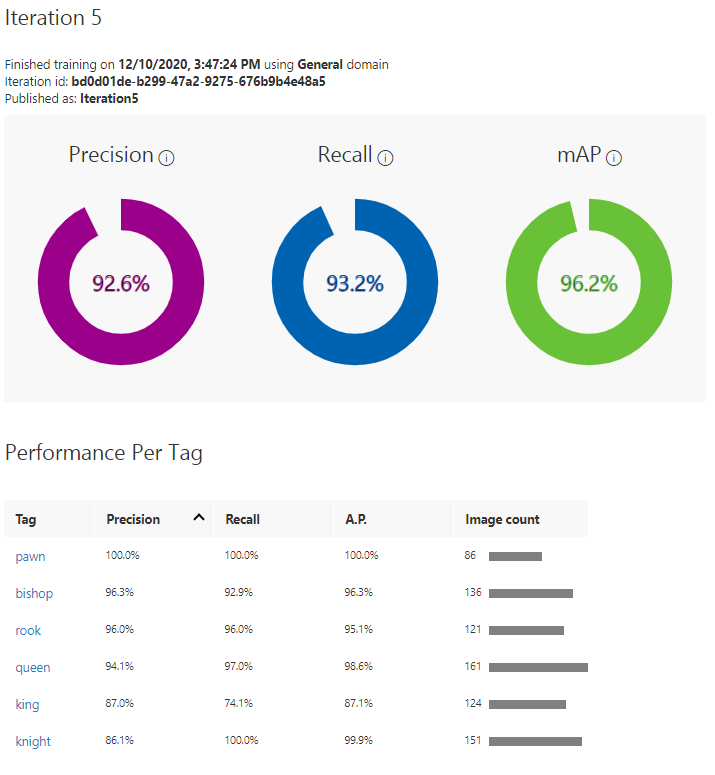
In the “Performance” tab I have selected a probability threshold of 70%, this means that if the label is less than 70% certain, it won’t count as a good result. I have also selected an overlap threshold of 50%, which means that the detected label bounding box should overlap at least 50% with the bounding box you have created in the portal, else it will not count as a good result either. After about 160 images and 24 hours of training, this is the result:
If you have obtained your key and url, go to the CustomVision Toolbox on your phone. Now enter the URL + Key. Point your phone at a few chess pieces and see how your model performs!